OnePlus is one of the bands which allows you to root your device without losing your warranty i.e. getting an unlocked bootloader out of the box. The steps to unlock and root your OnePlus Device are pretty easy. We are back with a guide on how to root OnePlus Devices. Rooting opens up another portal for you to explore. You can install additional modded apps, Xposed Framework, Magisk Modules. Rooting and unlocking your OnePlus device also allows you to flash Custom ROMs for your device. If you do, don’t forget to check out our guides for the best Custom ROMs for your device.
Before rooting your OnePlus Device, these are the steps we need to follow:
- Backup your data.
- Unlock the Bootloader
- Install a Custom Recovery (TWRP)
- Rooting your OnePlus Device
Necessary Files:
These steps are the same for all OnePlus devices in general. Just download the TWRP for your respective device from XDA or the above link.
Contents
Root Basic Terms
Some of the basic jargons include:
Bootloader
It starts the Android Operating System when you turn on your Phone and check everything else just like BIOS on your computer. One needs to unlock this bootloader to install a Custom Recovery.
Custom Recovery
It allows you to tinker on your device by flashing various Zips into your system, including flashing Custom ROMs. It also allows you to create backups of your current UI and restore them. You can also mount your storage when the device is off or bricked.
Let’s get started with the guide on rooting your OnePlus Device.
How to Unlock Bootloader on OnePlus Devices
Unlocking your bootloader is the first step towards rooting your OnePlus Device. It acts as a firewall of your device which doesn’t allow any system modifications. But, also remember to back up all your data before proceeding.

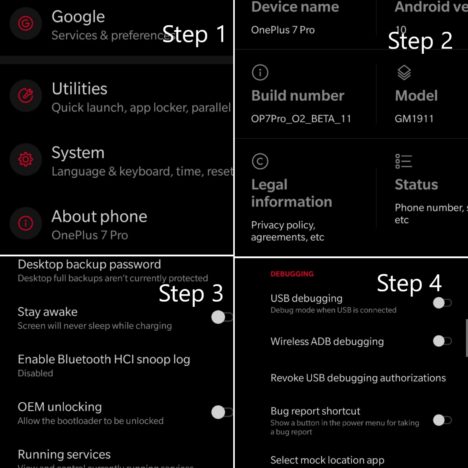
- Go to settings and scroll down until you find “About Phone.”
- Tap on the “About Phone” option, then scroll down and find the “Build Number” section.
- Tap on it seven times and go back.
- Now, in settings, look for “Developer Options” and tap it.
- Search in the list for “OEM Unlocking” and toggle it. It might ask you to enter the device pin and tap enable.
- Again, scroll down more and look for USB Debugging and toggle the same.
Now with that, your OnePlus device is ready to get its bootloader unlocked. Let us go ahead and unlock the bootloader of your OnePlus Device.
- Connect your OnePlus Device to the PC via the USB Cable.
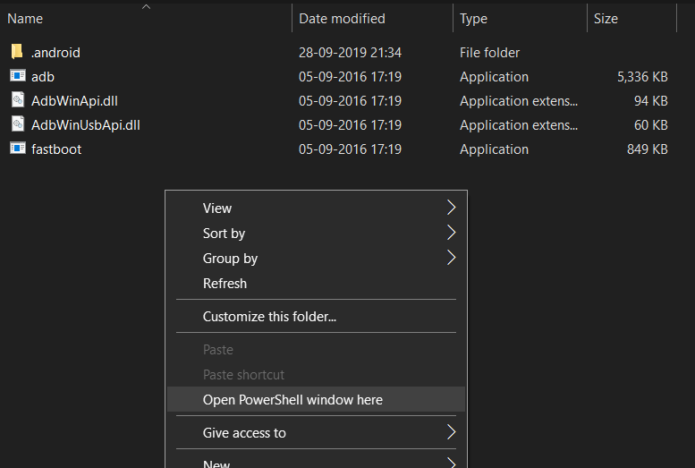
- Extract the ADB and Fastboot Zip into a folder.
- Open the same folder and Press Shift + Right Click. Then, click on “Open PowerShell/Command Window here.”
![]()
- The terminal would open. Enter the following command: “adb devices”
- It would show your detected OnePlus device. If no, consider installing drives from OnePlus.
- Then, after confirming the same, type the following command: “adb reboot bootloader”
- The device will boot into the fastboot menu and show you the status. Now, enter the following command in the terminal: “fastboot oem unlock”
- After this, check your phone for confirmation. Use the volume keys and select Unlock the bootloader option and use the power button to confirm your choice.
The bootloader of your OnePlus device would be unlocked. The device will reset itself to factory settings and reboot.
How to Install Custom Recovery on your OnePlus Device
Installing Custom Recovery is the next step after unlocking the bootloader on your OnePlus Device. We are going to install TWRP Recovery as it lets is root the device via Magisk Module. This makes it easier to flash Custom ROMs on your OnePlus device for the future as well.

- Download the TWRP Recovery for your respective device and move it into the same ADB & Fastboot Folder.
- Now, do the same as you did before to open the terminal. (Shift + Right Click)
- Once the terminal opens, enter the following command: “adb reboot bootloader”.
- In the fastboot menu, enter the command in the terminal: “fastboot boot twrp-3.2.3-1- fajita.img” where twrp- is the filename as you have it. (“fastboot boot filename”)
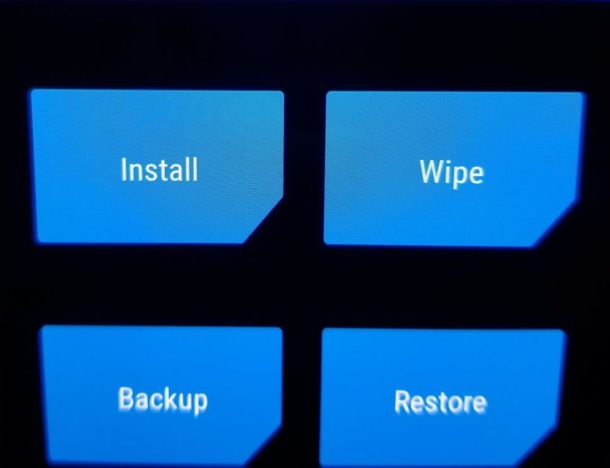
- After this, TeamWin Logo would flash at boot. You would be greeted with the TWRP menu. Swipe to allow modifications as requested.
- Click on the Install button to proceed and select the TWRP ZIP from your phone storage. Swipe to confirm flash, the TWRP Recovery would be installed and the device would reboot.
Thus, you have successfully installed TWRP Recovery on your OnePlus Device.
How to root your OnePlus Device
- Reboot your OnePlus device to recovery i.e. Power off and press the volume button simultaneously.
- Click on the Install option when booted into recovery. Then, browse to the magisk zip and swipe to confirm flash.
- Once it is installed, you’re done.

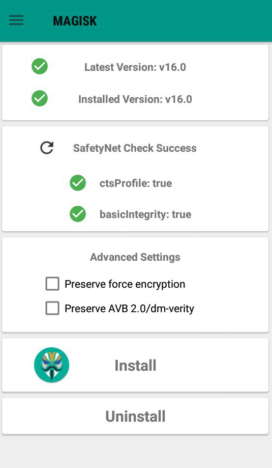
Thus, your OnePlus device would be rooted. You can confirm the same by looking for the Magisk Manager app on your phone. The app also allows you to install additional modules. You can even use the Magisk Hide module to use banking services without any errors.
That’s it to root your OnePlus Device. Follow these simple steps to root your OnePlus device. Now, you can install Custom ROMs and Custom Recoveries. If you have any difficulties in doing the same, feel free to reach us. All the power users drop a comment below on various Magisk modules you use.


